TIP TUESDAY
Acumatica Tips & Tricks to keep you on top!
Acumatica AP Bills By Project
In Acumatica 2012 R1, Acumatica’s made it easier than ever to be able process AP payments for specific projects if you want to or need to wait until a project milestone is reached before paying your vendors.
There is no new configuration required to start using this feature. However, you may want to consider if some vendors will allow you to pay by line if you process transactions for multiple projects on the same purchase order or bill, which may require some minor configuration changes. More information about the Pay by Line feature, which has been available for a while is available at the end of the document.
If you have questions about these updates, please reach out to CSSSupport@contegogroup.ca.
If you’re new to Acumatica, please click here for product information.
Process Bill Payments by Project
You will start on the Prepare Payments screen in the same way you would to prepare a regular payment run and populate your branch, payment method, cash account and payment dates along with any other standard payment filters you may use.
On the Prepare Payments screen, a new Project (1) filter has been added to allow you to process your AP bills by Project. Populate the new field with the project. The documents to pay fields will update to show any bills that meet the filter criteria.
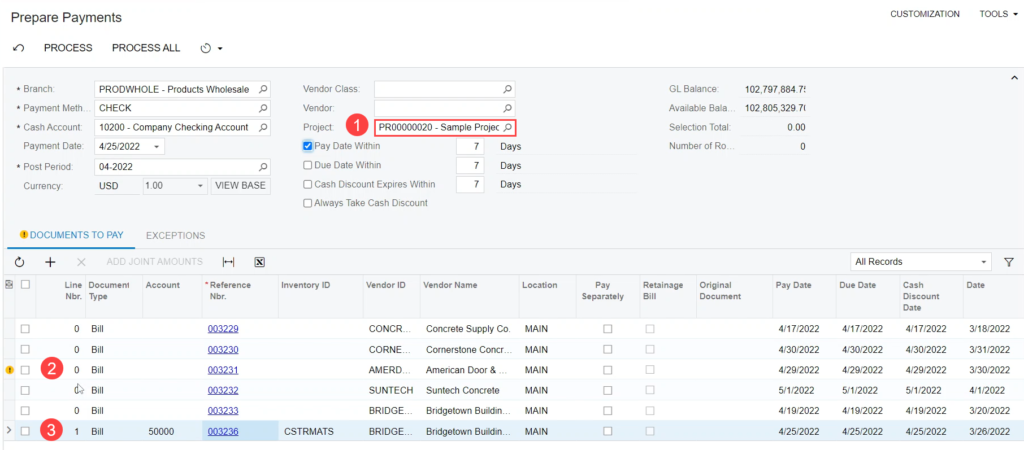
If a bill has lines for multiple projects (2), you will get a warning, allowing you to best decide how to proceed with payment in accordance with company policies and procedures. Without using the Pay by Line feature, the system needs to pay the bill in full. You can click on the blue link to the bill to open the bill to review the details if needed.

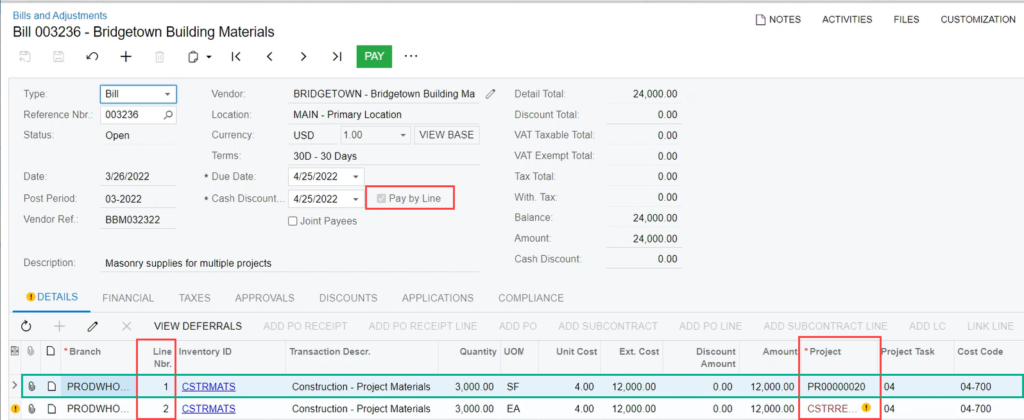
If a vendor has been set to allow payment by line (3), then the system will only pay for the items related to the selected project. Here’s a screenshot of Bill 003236.
The vendor is set to “Pay by Line” and the bill has 2 lines for different projects and the system has only selected line 1 for payment, as it matches the selected project.
Once all bills have been selected for payment, you can continue processing the payment normally to generate and post your cheques or bank transfer files.
Pay By Line Feature:
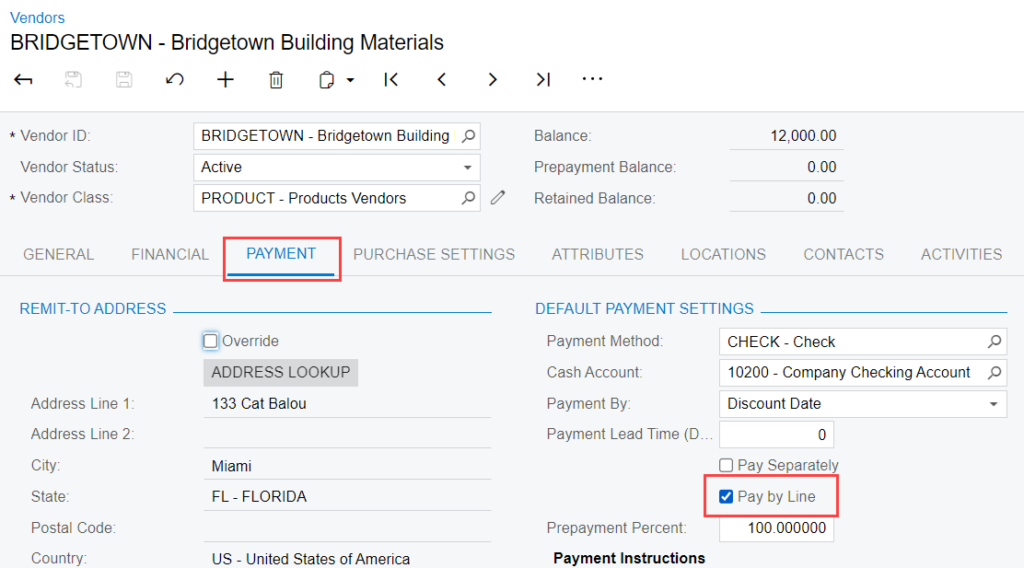
To allow for bills to be paid by line, the Payment Application by Line feature must be enabled on the Enable/Disable Features form. By default, any existing vendors will have the Pay by Line option deselected. Once the feature is enabled, you will need to update the appropriate Vendor Classes and Vendor Profiles. This will change the default setting on any bill entered in the future to have the Pay by Line option selected.
The Pay by Line option is available on the Vendor Profile, on the Payment tab
If you would like any assistance with updating your AP Bills By Project or any other new feature, please reach out to our Acumatica team at CSSSuport@ContegoGroup.ca.

